Introduction
Every workbook contains at least one worksheet by default. When working with a large amount of data, you can create multiple worksheets to help organize your workbook and make it easier to find content. You can also group worksheets to quickly add information to multiple worksheets at the same time.
Optional: Download our practice workbook.
Watch the video below to learn more about using multiple worksheets.
To insert a new worksheet:
- Locate and select the New sheet button near the bottom-right corner of the Excel window.
- A new blank worksheet will appear.


By default, any new workbook you create in Excel will contain one worksheet, called Sheet1. To change the default number of worksheets, navigate to Backstage view, click Options, then choose the desired number of worksheets to include in each new workbook.
To copy a worksheet:
If you need to duplicate the content of one worksheet to another, Excel allows you to copy an existing worksheet.- Right-click the worksheet you want to copy, then select Move or Copy from the worksheet menu.
- The Move or Copy dialog box will appear. Choose where the sheet will appear in the Before sheet: field. In our example, we'll choose (move to end) to place the worksheet to the right of the existing worksheet.
- Check the box next to Create a copy, then click OK.
- The worksheet will be copied. It will have the same title as the original worksheet, as well as a version number. In our example, we copied the November worksheet, so our new worksheet is named November (2). All content from the November worksheet has also been copied to the new worksheet.


You can also copy a worksheet to an entirely different workbook. You can select any workbook that is currently open from the To book: drop-down menu.
To rename a worksheet:
- Right-click the worksheet you want to rename, then select Rename from the worksheet menu.
- Type the desired name for the worksheet.
- Click anywhere outside the worksheet tab, or press Enter on your keyboard. The worksheet will be renamed.


To move a worksheet:
- Click and drag the worksheet you want to move until a small black arrow appears above the desired location.
- Release the mouse. The worksheet will be moved.


To change the worksheet tab color:
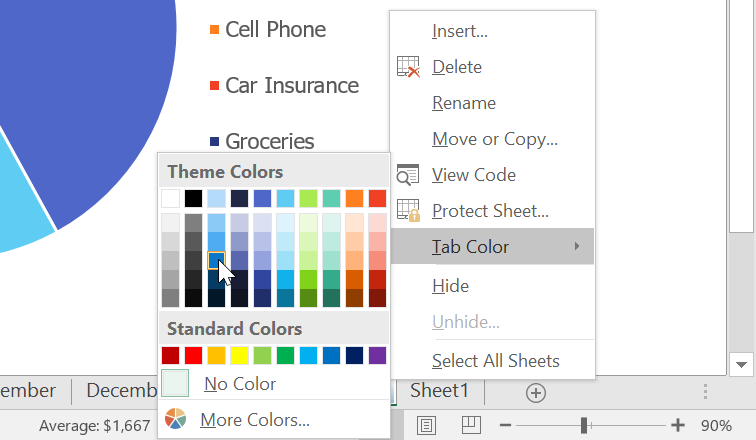
- Right-click the desired worksheet tab, and hover the mouse over Tab Color. The Color menu will appear.
- Select the desired color.
- The worksheet tab color will be changed.

The worksheet tab color is considerably less noticeable when the worksheet is selected. Select another worksheet to see how the color will appear when the worksheet is not selected.

To delete a worksheet:
- Right-click the worksheet you want to delete, then select Delete from the worksheet menu.
- The worksheet will be deleted from your workbook.


If you want to prevent specific worksheets from being edited or deleted, you can protect them by right-clicking the desired worksheet and selecting Protect Sheet from the worksheet menu.
Grouping and ungrouping worksheets
You can work with each worksheet individually, or you can work with multiple worksheets at the same time. Worksheets can be combined together into a group. Any changes made to one worksheet in a group will be made to every worksheet in the group.To group worksheets:
- Select the first worksheet you want to include in the worksheet group.
- Press and hold the Ctrl key on your keyboard. Select the next worksheet you want in the group.
- Continue to select worksheets until all of the worksheets you want to group are selected, then release the Ctrl key. The worksheets are now grouped.


While worksheets are grouped, you can navigate to any worksheet within the group. Any changes made to one worksheet will appear on every worksheet in the group. However, if you select a worksheet that is not in the group, all of your worksheets will become ungrouped.
To ungroup worksheets:
- Right-click a worksheet in the group, then select Ungroup Sheets from the worksheet menu.
- The worksheets will be ungrouped. Alternatively, you can simply click any worksheet not included in the group to ungroup all worksheets.

